Seamless Integration of Next.js 13.4 with AWS SDK: Deploying on Route53, ALB, and ECS using Terraform
9/15/2023, Published in Medium, DevTo and HashNode
2 mins read
200
Discover how to effectively utilize the AWS SDK within a Next.js 13.4 application with server components and deploy it on AWS using Terraform. From Route53's DNS management, ALB's load balancing capabilities to ECS's container orchestration, get an in-depth understanding of each stage. We'll also delve into the significance of secure connections and how to achieve them in your setup
Hello readers! Today, I'll be guiding you step-by-step on a fascinating journey that integrates AWS-SDK with the latest version of Next.js, 13.4. The exciting features of this version, including App Router and the much-anticipated server components, make it an ideal choice for modern web applications. Also, will walk through step by step in deploying the application on AWS using terraform starting from ECR for storing container images, route53's DNS management, ALB load balancing to ECS container orchestration. We will also leverage Github Actions to build, publish application to ECR and deploy to AWS using terraform using terraform actions.
Use case
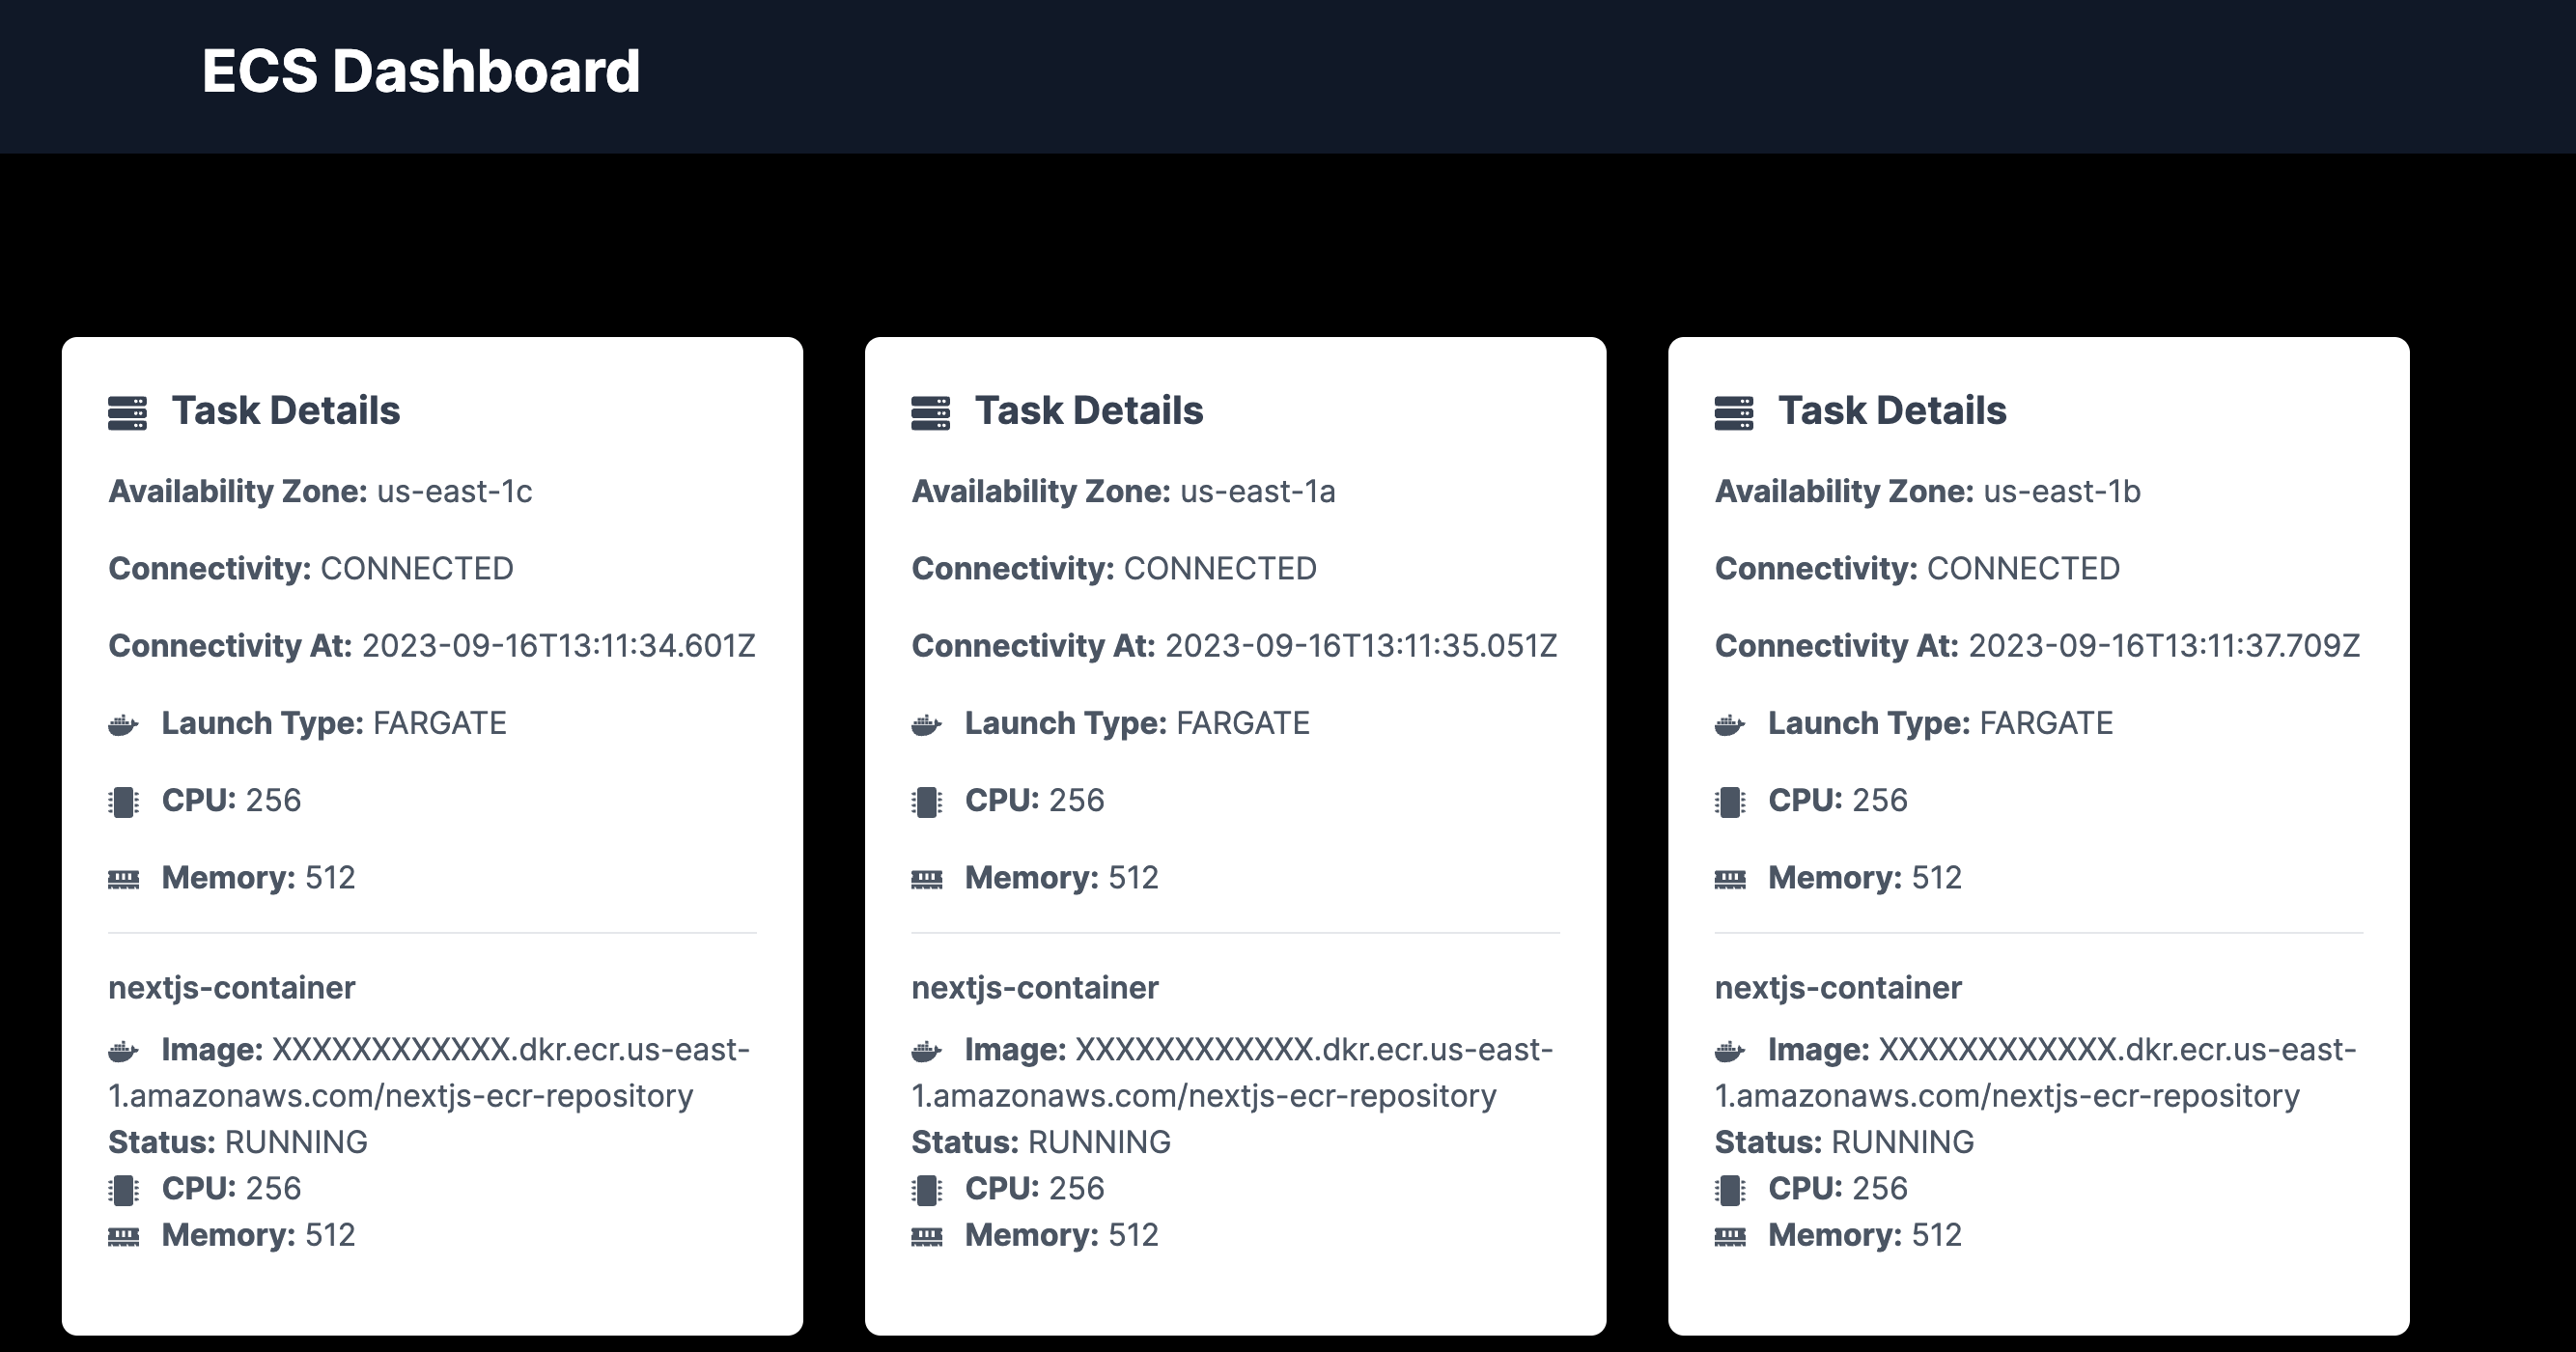
To make our journey tangible, we will be creating a full-fledged application using Next.js. This application will serve a comprehensive dashboard detailing the currently running ECS tasks for this app. You'll be privy to metrics such as the number of ECS tasks, the Availability Zones they operate within, their connectivity parameters, Launch type, allocated memory, and so much more.
Please refer the following links:
Application URL: https://dev-next.cloudysky.link/
GitHub Project: https://github.com/SandeepKumarYaramchitti/nextjs-ecs-github-actions
Deployment Overview
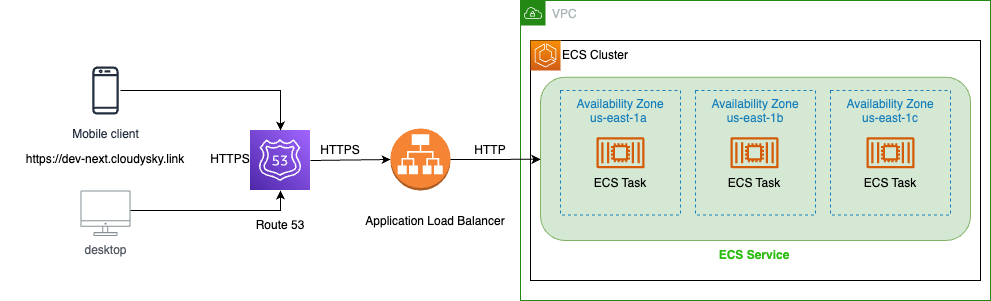
Our deployment isn't just about getting our application up and running; it's about doing so securely, efficiently, and scalably. We'll set up an SSL configuration using AWS Certificate Manager, master DNS management with Route53, and ensure efficient traffic distribution with ALB. All these while orchestrating our containers using the mighty ECS.
To bring all of these components together, we'll rely on the synergy between Route53, ALB, and ECS, a trifecta that ensures our application isn't just available, but resilient, scalable, and performant and we will do it with Infrastructure as Code with Terraform.
Continuous Deployment with GitHub Actions
But there is more! We will use Github actions for our CI/CD, we'll automate the process of building our Next.js app, publishing it to ECR, and then deploying it seamlessly to AWS using the terraform GitHub action.
Let's Get Started
1. Setting up our Next.js 13.4 Application
Create Next.js application using `create-next-app` and follow the docs here for the step by step process. Once you have the Next.js app up and running, install aws-sdk with npm.
You can also refer my GitHub repo as a starting point - https://github.com/SandeepKumarYaramchitti/nextjs-ecs-github-actions
2.Designing the ECS Dashboard
We will be building our Next.js application that will display the ECS task definition details as a card component with a header in the Next.js application. Refer the actual application for more information.
Application URL: https://dev-next.cloudysky.link/
3. Building the application
As I mentioned, we will creating the above app using server components and App routing; lets get into the code now.
Let us create our API using route handler that can integrate to AWS ECS service using aws-sdk. Route Handlers are only available inside the app directory. They are the equivalent of API Routes inside the pages directory meaning you do not need to use API Routes and Route Handlers together.
We will be using HTTP Method GET with extended helper functions from Next.js i. e NextRequest and NextResponse . Install aws-sdk if you have not done it yet.
import { NextResponse } from 'next/server'
import { ECS } from 'aws-sdk';

type ExtractedTaskData = {
  availabilityZone: string;
  connectivity: string;
  connectivityAt: string;
  containers: {
    name: string;
    image: string;
    lastStatus: string;
    cpu: string;
    memory: string;
  }[];
  cpu: string;
  memory: string;
  launchType: string;
};

const maskAccountId = (imageUrl: string): string => {
  return imageUrl.replace(/(\d{12})\.dkr\.ecr\.us-east-1\.amazonaws\.com/, 'XXXXXXXXXXXX.dkr.ecr.us-east-1.amazonaws.com');
};

const extractTaskData = (data: any): ExtractedTaskData[] => {
  if (!data.tasks) return [];

  return data.tasks.map((task: any) => ({
    availabilityZone: task.availabilityZone,
    connectivity: task.connectivity,
    connectivityAt: task.connectivityAt,
    containers: task.containers.map((container: any) => ({
      name: container.name,
      image: maskAccountId(container.image),
      lastStatus: container.lastStatus,
      cpu: container.cpu,
      memory: container.memory,
    })),
    cpu: task.cpu,
    memory: task.memory,
    launchType: task.launchType,
  }));
};

export async function GET() {


  const ecs = new ECS({ region: 'us-east-1' });

    const data = await ecs.listTasks({ cluster: 'nextjs-cluster' }).promise();

    if (!data.taskArns || data.taskArns.length === 0) {
      throw new Error('No tasks found for the specified cluster.');
    }

    const rawtaskDetails = await ecs.describeTasks({
      cluster: 'nextjs-cluster',
      tasks: data.taskArns
    }).promise();

    const sanitizedData = extractTaskData(rawtaskDetails);
    return NextResponse.json(sanitizedData)


}
Imports and Type Definitions:
- NextResponse from next/server helps send back responses from server-side functions in Next.js.
- ECS from aws-sdk is the SDK for interacting with AWS's Elastic Container Service.
- ExtractedTaskData type provides a structured way to shape the data we want to extract from the ECS task response.
Utility Functions:
- maskAccountId is a helper function that masks AWS account IDs in image URLs for privacy/security reasons.
- extractTaskData takes the raw data fetched from ECS and transforms it to return a structured and sanitized version.
The main GET function:
- An instance of the ECS class is created to interact with the ECS service in the us-east-1 region.
- The listTasks method fetches a list of task ARNs (Amazon Resource Names) for a cluster named nextjs-cluster.
- If there are no tasks in the cluster, an error is thrown.
- For each task ARN in the list, detailed task descriptions are fetched using the describeTasks method.
- The raw task details are sanitized using the extractTaskData function.
- Finally, the sanitized task data is sent as a JSON response using Next.js's NextResponse.json().
Now, lets move on to building the frontend for the application.
As this is a basic UI, I will be using 3 components as building blocks for my application i. e
Header.tsx
import * as React from 'react'
export default function Header() {
    return (
        <div className="bg-gray-900">
        <div className="max-w-7xl mx-auto py-6 px-4 sm:px-6 lg:px-8">
            <h1 className="text-3xl font-bold leading-tight text-white">
            ECS Dashboard
            </h1>
        </div>
        </div>
    )
}
ECSTasks.tsx
import * as React from 'react'
import TaskCard from './TaskCard'

export default async function ECSTasks() {

    const BASE_URL = process.env.NEXT_PUBLIC_BASE_URL || 'https://dev-next.cloudysky.link'

    const data= await fetch(`${BASE_URL}/api/awsservice`, { cache: 'no-cache' })
    if (!data.ok) {
        return <div>Failed to load</div>
    }
    const ecsDetails = await data.json()

    return (
      <div className='flex items-center justify-center min-h-screen  flex-wrap'>
        {ecsDetails.map((task: ExtractedTaskData, index: number) => (
          <TaskCard task={task} key={index} />
        ))}
      </div>
    )
}

type ExtractedTaskData = {
  availabilityZone: string;
  connectivity: string;
  connectivityAt: string;
  containers: {
    name: string;
    image: string;
    lastStatus: string;
    cpu: string;
    memory: string;
  }[];
  cpu: string;
  memory: string;
  launchType: string;
};
This code represents a React component named ECSTasks that fetches and displays details of Elastic Container Service (ECS) tasks from a specified URL. Using a defined environment variable or a default URL, it makes an API request to get task data. If the API call is unsuccessful, the component displays an error message. However, upon successful data retrieval, it maps through the array of ECS tasks, presenting each task's details using a component named TaskCard. The expected shape of each ECS task's data is described by the type ExtractedTaskData. This type outlines the properties and structure of the data, such as availability zones, connectivity information, container details, and resource specifications like CPU and memory. The overall design of the component employs a flexbox layout, ensuring that the TaskCard components are centered and wrapped within the viewport.
Taskcard.tsx
import React from 'react';
import { FaServer, FaMemory, FaMicrochip, FaDocker } from 'react-icons/fa';
type ExtractedTaskData = {
  availabilityZone: string;
  connectivity: string;
  connectivityAt: string;
  containers: {
    name: string;
    image: string;
    lastStatus: string;
    cpu: string;
    memory: string;
  }[];
  cpu: string;
  memory: string;
  launchType: string;
};

export default function TaskCard({ task }: { task: ExtractedTaskData }) {
  return (
    <div className="bg-white p-6 m-4 rounded-lg shadow-md w-96">
      <h2 className="text-xl font-bold mb-4 text-gray-700"><FaServer className="inline-block mr-2" /> Task Details</h2>

      <div className="mb-4 text-gray-600">
        <span className="font-bold text-gray-600">Availability Zone:</span> {task.availabilityZone}
      </div>

      <div className="mb-4 text-gray-600">
        <span className="font-bold">Connectivity:</span> {task.connectivity}
      </div>

      <div className="mb-4 text-gray-600">
        <span className="font-bold">Connectivity At:</span> {task.connectivityAt}
      </div>

      <div className="mb-4 text-gray-600">
        <span className="font-bold"><FaDocker className="inline-block mr-2" /> Launch Type:</span> {task.launchType}
      </div>

      <div className="mb-4 text-gray-600">
        <span className="font-bold"><FaMicrochip className="inline-block mr-2" /> CPU:</span> {task.cpu}
      </div>

      <div className="mb-4 text-gray-600">
        <span className="font-bold"><FaMemory className="inline-block mr-2" /> Memory:</span> {task.memory}
      </div>

      {task.containers.map((container, index) => (
        <div key={index} className="mb-4 border-t pt-4 text-gray-600">
          <h3 className="font-semibold text-md mb-2">{container.name}</h3>
          <p><span className="font-bold"><FaDocker className="inline-block mr-2" /> Image:</span> {container.image}</p>
          <p><span className="font-bold">Status:</span> {container.lastStatus}</p>
          <p><span className="font-bold"><FaMicrochip className="inline-block mr-2" /> CPU:</span> {container.cpu}</p>
          <p><span className="font-bold"><FaMemory className="inline-block mr-2" /> Memory:</span> {container.memory}</p>
        </div>
      ))}
    </div>
  );
}
The code defines a React component named TaskCard that visually represents the details of an Elastic Container Service (ECS) task. Leveraging a combination of text and icons from the 'react-icons' library, it displays information about the task, including availability zones, connectivity, launch type, CPU, and memory. Furthermore, for each container within the task, the component showcases container-specific details, such as the image, status, and resource allocations.
As a last step, lets look at the page.tsx which imports the ECSTasks component to display in on the home page.
import Image from 'next/image'
import ECSTasks from './components/ECSTasks';


export default async function Home() {

  return (
    <main className="flex min-h-screen max-w-7xl flex-col items-center justify-between p-15">
      <ECSTasks />
    </main>
  )
}
3. Building and Storing with ECR
With our app ready, it's time to containerize it. Using Docker, create an image of your application. Once done:
- Set up an ECR repository on AWS. (You can refer the AWS documentation to create this. )
Now, lets create the Github Actions workflow to build and publish image to ECR. Please setup the required secrets in your github repo.
name: Build and Publish to ECS

on:
  workflow_dispatch:

  push:
    branches:
      - main

env:
  AWS_REGION: us-east-1
  ECR_REPOSITORY: nextjs-ecr-repository

jobs:
  deploy:
    runs-on: ubuntu-latest

    steps:
    - name: Checkout code
      uses: actions/checkout@v3

    - name: Configure AWS credentials
      uses: aws-actions/configure-aws-credentials@v2
      with:
        aws-access-key-id: ${{ secrets.AWS_ACCESS_KEY_ID }}
        aws-secret-access-key: ${{ secrets.AWS_SECRET_ACCESS_KEY }}
        aws-region: ${{ env.AWS_REGION }}

    - name: Install dependencies
      run: npm install

    - name: Run build
      run: npm run build  # Replace with your build command

    - name: Login to Amazon ECR
      uses: aws-actions/amazon-ecr-login@v1

    - name: Build Docker image
      run: |
        docker build -t ${{ secrets.AWS_ACCOUNT_ID }}.dkr.ecr.${{ env.AWS_REGION }}.amazonaws.com/nextjs-ecr-repository:latest .

    - name: Push Docker image to ECR
      run: |
        docker push ${{ secrets.AWS_ACCOUNT_ID }}.dkr.ecr.${{ env.AWS_REGION }}.amazonaws.com/nextjs-ecr-repository:latest
4. Terraforming Our Infrastructure
- Initialize your Terraform environment.
- Create resources for ECS, ALB, and Route53.
- Incorporate SSL via AWS Certificate Manager.
- Apply the Terraform scripts to build out your infrastructure.
provider "aws" {
  region = var.region
}

# VPC & Subnets
resource "aws_default_vpc" "main_vpc" {}

resource "aws_default_subnet" "subnet_us_east_1a" {
  availability_zone = "us-east-1a"
}

resource "aws_default_subnet" "subnet_us_east_1b" {
  availability_zone = "us-east-1b"
}

resource "aws_default_subnet" "subnet_us_east_1c" {
  availability_zone = "us-east-1c"
}

# SSL Certificate
resource "aws_acm_certificate" "ssl_cert" {
  domain_name       = var.custom_domain_name
  validation_method = "DNS"
  tags = {
    Name = "cloudysky.link-cert"
  }
}

resource "aws_route53_record" "ssl_cert_validation_record" {
  zone_id = var.hosted_zone_id
  name    = tolist(aws_acm_certificate.ssl_cert.domain_validation_options)[0].resource_record_name
  type    = tolist(aws_acm_certificate.ssl_cert.domain_validation_options)[0].resource_record_type
  records = [tolist(aws_acm_certificate.ssl_cert.domain_validation_options)[0].resource_record_value]
  ttl     = 60
}

resource "aws_acm_certificate_validation" "ssl_cert_validation" {
  certificate_arn         = aws_acm_certificate.ssl_cert.arn
  validation_record_fqdns = [aws_route53_record.ssl_cert_validation_record.fqdn]
}

data "aws_ecr_repository" "nextjs_repo" {
  name = "nextjs-ecr-repository"
}

# ECS Resources
resource "aws_ecs_cluster" "nextjs_cluster" {
  name = "nextjs-cluster"
}

resource "aws_ecs_task_definition" "nextjs_task" {
  family                = "nextjs-task"
  container_definitions = <<-DEFINITION
  [
    {
      "name": "nextjs-container",
      "image": "${data.aws_ecr_repository.nextjs_repo.repository_url}",
      "essential": true,
      "portMappings": [
        {
          "containerPort": 8080,
          "hostPort": 8080
        }
      ],
      "memory": 512,
      "cpu": 256,
      "environment": [
        {
          "name": "NEXT_PUBLIC_BASE_URL",
          "value": "https://dev-next.cloudysky.link"
        }
      ]
    }
  ]
  DEFINITION

  requires_compatibilities = ["FARGATE"]
  network_mode             = "awsvpc"
  memory                   = 512
  cpu                      = 256
  execution_role_arn       = aws_iam_role.ecs_execution_role.arn
}

data "aws_iam_policy_document" "ecs_role_assumption" {
  statement {
    actions = ["sts:AssumeRole"]
    principals {
      type        = "Service"
      identifiers = ["ecs-tasks.amazonaws.com"]
    }
  }
}

resource "aws_iam_role" "ecs_execution_role" {
  name               = "NextJS-ECSTaskExecutionRole"
  assume_role_policy = data.aws_iam_policy_document.ecs_role_assumption.json
}

resource "aws_iam_role_policy_attachment" "ecs_execution_role_policy_attach" {
  role       = aws_iam_role.ecs_execution_role.name
  policy_arn = "arn:aws:iam::aws:policy/service-role/AmazonECSTaskExecutionRolePolicy"
}

# ALB & Security Groups
resource "aws_security_group" "alb_sg" {
  name = "ALB-SecurityGroup"
  ingress {
    from_port   = 443
    to_port     = 443
    protocol    = "tcp"
    cidr_blocks = ["0.0.0.0/0"]
  }
  egress {
    from_port   = 0
    to_port     = 0
    protocol    = "-1"
    cidr_blocks = ["0.0.0.0/0"]
  }
}

resource "aws_alb" "nextjs_alb" {
  name               = "NextJS-ALB"
  load_balancer_type = "application"
  subnets = [
    aws_default_subnet.subnet_us_east_1a.id,
    aws_default_subnet.subnet_us_east_1b.id,
    aws_default_subnet.subnet_us_east_1c.id
  ]
  security_groups = [aws_security_group.alb_sg.id]
}

resource "aws_lb_target_group" "nextjs_tg" {
  name        = "NextJS-TargetGroup"
  port        = 80
  protocol    = "HTTP"
  target_type = "ip"
  vpc_id      = aws_default_vpc.main_vpc.id
}

resource "aws_lb_listener" "https_listener" {
  load_balancer_arn = aws_alb.nextjs_alb.arn
  port              = 443
  protocol          = "HTTPS"
  ssl_policy        = "ELBSecurityPolicy-2016-08"
  certificate_arn   = aws_acm_certificate_validation.ssl_cert_validation.certificate_arn

  default_action {
    type             = "forward"
    target_group_arn = aws_lb_target_group.nextjs_tg.arn
  }
}

# Route53 Record
resource "aws_route53_record" "nextjs_domain_record" {
  zone_id = var.hosted_zone_id
  name    = var.custom_domain_name
  type    = "A"

  alias {
    name                   = aws_alb.nextjs_alb.dns_name
    zone_id                = aws_alb.nextjs_alb.zone_id
    evaluate_target_health = false
  }
}

# ECS Service
resource "aws_ecs_service" "nextjs_service" {
  name                 = "NextJS-Service"
  cluster              = aws_ecs_cluster.nextjs_cluster.id
  task_definition      = aws_ecs_task_definition.nextjs_task.arn
  launch_type          = "FARGATE"
  desired_count        = 3
  force_new_deployment = true

  load_balancer {
    target_group_arn = aws_lb_target_group.nextjs_tg.arn
    container_name   = "nextjs-container"
    container_port   = 8080
  }

  network_configuration {
    subnets          = [aws_default_subnet.subnet_us_east_1a.id, aws_default_subnet.subnet_us_east_1b.id, aws_default_subnet.subnet_us_east_1c.id]
    assign_public_ip = true
    security_groups  = [aws_security_group.ecs_service_sg.id]
  }
}

resource "aws_security_group" "ecs_service_sg" {
  name = "ECS-Service-SecurityGroup"
  ingress {
    from_port       = 0
    to_port         = 0
    protocol        = "-1"
    security_groups = [aws_security_group.alb_sg.id]
  }
  egress {
    from_port   = 0
    to_port     = 0
    protocol    = "-1"
    cidr_blocks = ["0.0.0.0/0"]
  }
}
- AWS Provider: Specifies that the AWS cloud provider is being used, with the AWS region being sourced from a variable.
- VPC & Subnets: The default VPC is being used. Three default subnets are defined for three availability zones in the us-east-1 region.
- SSL Certificate: An AWS Certificate Manager (ACM) SSL certificate is created for a custom domain. A Route53 DNS record is used for domain validation.
- ECS Resources: A new Elastic Container Service (ECS) cluster and task definition for a Next.js application is defined. The task uses a container image from an ECR repository and runs on AWS Fargate. An execution IAM role for the ECS task is also created.
- ALB & Security Groups: An Application Load Balancer (ALB) is set up with its security group. The ALB listens on HTTPS port 443 and forwards traffic to a target group. The target group uses HTTP and targets the ECS service.
- Route53 Record: A DNS A record is created in Route53, pointing to the ALB, thus linking the custom domain to the load balancer.
- ECS Service: Defines an ECS service that runs the Next.js tasks on Fargate. The service is linked to the previously defined ALB and is configured to run three instances of the task. Another security group specific to the ECS service is also established.
In essence, the script sets up an environment where a Next.js application is containerized, then served via ECS running on Fargate, with traffic routed through an ALB, and the domain managed through Route53.
5. Automating Deployment with GitHub Actions
- Create a workflow file for GitHub Actions.
- Define jobs to build your Next.js app, push to ECR, and then trigger Terraform for deployment.
- Commit and watch GitHub Actions work its magic!
name: Next.js ECS Deploy

on:
  workflow_dispatch:

jobs:
  terraform:
    name: 'Terraform'
    runs-on: ubuntu-latest

    steps:
      - name: Checkout code
        uses: actions/checkout@v3

      - name: List out directory
        run: ls

      - name: Set up Terraform
        uses: hashicorp/setup-terraform@v2
        with:
          cli_config_credentials_token: ${{ secrets.TF_API_TOKEN }}
          terraform_wrapper: false

      - name: Terraform init
        run: terraform init

      - name: Terraform Apply
        env:
          AWS_DEFAULT_REGION: us-east-1
          TF_VAR_custom_domain_name: ${{ secrets.CUSTOM_DOMAIN_NAME }}
          TF_VAR_hosted_zone_id: ${{ secrets.HOSTED_ZONE_ID }}
          # Add other variables as needed
        run: terraform apply -auto-approve
In Conclusion
By the end of this journey, you'd have not only integrated the AWS-SDK with the latest version of Next.js but also deployed it to a robust AWS infrastructure using Terraform, all while automating the process using GitHub Actions.
Thank you for coming along on this journey. Watch out this space for more blogs...
Sandeep Yaramchitti
- Bringing my ideas into life through Code.
ALL SYSTEMS ONLINE